 VIPSolutions
Give step-by-step solution with explanation and final answer:— 200 mm — ARS 2) ~ » 100 mm WN A \ | 90 N B RL 1- Sketch the free-body diagram for the AB bar shown in the figure. 2- Sketch the free-body diagram for the DB bar shown in the figure. 3- Write the equilibrium equations for cach free-body diagram. 4- Solve for Reactions in A, B, and D.
Question:
Give step-by-step solution with explanation and final answer: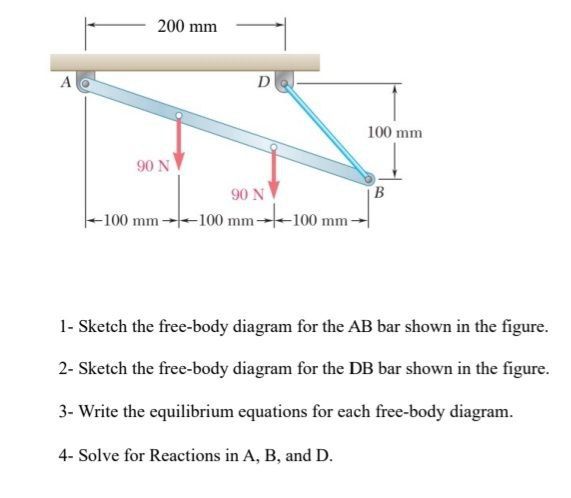 — 200 mm —
ARS 2) ~
» 100 mm
WN A \ |
90 N B
RL
1- Sketch the free-body diagram for the AB bar shown in the figure.
2- Sketch the free-body diagram for the DB bar shown in the figure.
3- Write the equilibrium equations for cach free-body diagram.
4- Solve for Reactions in A, B, and D.
This is AI generated Response.
Asked by: Rahul
Created at: 2026-01-25 20:37:46
Asked by: Rahul
Created at: 2026-01-25 20:37:46
Final Answer:
Rendered
Raw Text
Did you like this answer?
Let's solve the problem step by step:
---
## **1. Free-Body Diagram for Bar AB**
Bar AB is a two-force member with:
- Pin at **A** (reaction: \( A_x, A_y \))
- Pin at **B** (reaction: \( B_x, B_y \))
- Two downward forces of 90 N each at 100 mm and 200 mm from A.
**Diagram:**
```
A (pin)
|-------------------|-------------------|
<--100mm--|--100mm--|--100mm--> (200mm total)
↓90N ↓90N
```
- At A: \( A_x \) (horizontal), \( A_y \) (vertical)
- At B: \( B_x \) (horizontal), \( B_y \) (vertical)
- At 100 mm from A: \( 90\,N \) downward
- At 200 mm from A (at B): \( 90\,N \) downward
---
## **2. Free-Body Diagram for Bar DB**
Bar DB is pinned at D and B. The bar is 100 mm long, vertical.
**Diagram:**
```
D (pin)
|
|
|
B (pin)
```
- At D: \( D_x, D_y \) (reactions at D)
- At B: \( B_x', B_y' \) (reactions at B, equal and opposite to those on AB)
---
## **3. Equilibrium Equations**
### **For Bar AB:**
Sum of forces in x and y, sum of moments about A.
#### \(\Sigma F_x = \):
\[
A_x + B_x =
\]
#### \(\Sigma F_y = \):
\[
A_y + B_y - 90 - 90 = \implies A_y + B_y = 180
\]
#### \(\Sigma M_A = \): (Take counterclockwise as positive, moments due to forces at distances from A)
- 90 N at 100 mm: \(90 \times 100\)
- 90 N at 200 mm: \(90 \times 200\)
- B's forces at 200 mm: \(B_y \times 200\) (vertical), \(B_x \times \) (horizontal, passes through A, no moment)
\[
-90 \times 100 - 90 \times 200 + B_y \times 200 =
\]
\[
-900 - 18000 + 200B_y =
\]
\[
-27000 + 200 B_y =
\]
\[
B_y = \frac{27000}{200} = 135\,N
\]
From \(\Sigma F_y\):
\[
A_y + 135 = 180 \implies A_y = 45\,N
\]
From \(\Sigma F_x\):
\[
A_x + B_x = \implies A_x = -B_x
\]
---
### **For Bar DB:**
Bar DB is in equilibrium (assume DB is a two-force member, so the force is along DB).
- At D: \( D_x, D_y \)
- At B: \( B_x', B_y' \) (should be equal and opposite to B_x, B_y from AB)
#### \(\Sigma F_x = \):
\[
D_x + B_x' =
\]
#### \(\Sigma F_y = \):
\[
D_y + B_y' =
\]
Since at B, the sum of forces from both bars must be zero, and B_x', B_y' are equal and opposite to B_x, B_y from AB.
---
## **4. Solve for Reactions at A, B, and D**
### **At B:**
From above:
\[
B_y = 135\,N \quad (upward)
\]
\[
B_x: \text{Let us find B_x}
\]
But bar DB is at a slope, so the force in DB (call it F_DB) acts along DB.
The geometry:
- Horizontal distance from D to B: 100 mm
- Vertical distance: 100 mm
So, angle \( \theta = 45^\circ \).
\[
\sin\theta = \cos\theta = \frac{100}{\sqrt{100^2 + 100^2}} = \frac{100}{141.42} = .707
\]
Force in DB (F_DB) at B:
- \( B_x = F_{DB} \cos(45^\circ) \)
- \( B_y = F_{DB} \sin(45^\circ) \)
But from above, \( B_y = 135\,N \).
So,
\[
B_y = F_{DB} \times .707 = 135 \implies F_{DB} = \frac{135}{.707} = 191\,N
\]
\[
B_x = F_{DB} \times .707 = 191 \times .707 = 135\,N
\]
But which direction is B_x? Since A_x = -B_x, and A_x is at A, let's check the sense.
### **At A:**
\[
A_x = -B_x = -135\,N
\]
\[
A_y = 45\,N
\]
### **At D:**
At D (reactions from bar DB):
\[
D_x = -B_x = -135\,N
\]
\[
D_y = -B_y = -135\,N
\]
(acts up and to the left)
---
## **Summary Table**
| Point | \( F_x \) (N) | \( F_y \) (N) |
|-------|:-------------:|:-------------:|
| A | -135 | 45 |
| B | 135 | 135 |
| D | -135 | -135 |
---
## **Final Answers**
1. **Free-body diagrams:**
- For AB: Show A reactions (\(A_x, A_y\)), B reactions (\(B_x, B_y\)), two downward 90 N forces.
- For DB: Show D reactions (\(D_x, D_y\)), B reactions (\(B_x', B_y'\)), both along DB's axis.
2. **Equilibrium Equations:**
- For AB:
\[
\sum F_x = : \quad A_x + B_x =
\]
\[
\sum F_y = : \quad A_y + B_y - 180 =
\]
\[
\sum M_A = : \quad -90 \times 100 - 90 \times 200 + B_y \times 200 =
\]
- For DB:
\[
\sum F_x = : \quad D_x + B_x' =
\]
\[
\sum F_y = : \quad D_y + B_y' =
\]
3. **Reactions:**
- At A: \(A_x = -135\,N\), \(A_y = 45\,N\)
- At B: \(B_x = 135\,N\), \(B_y = 135\,N\)
- At D: \(D_x = -135\,N\), \(D_y = -135\,N\)
---
### **Boxed Final Answers**
\[
\boxed{
\begin{aligned}
A_x &= -135\,\text{N} \quad & A_y &= 45\,\text{N} \\
B_x &= 135\,\text{N} \quad & B_y &= 135\,\text{N} \\
D_x &= -135\,\text{N} \quad & D_y &= -135\,\text{N}
\end{aligned}
}
\]
If you need the diagrams sketched or a clearer layout, let me know!
Question:
Then solved
This is AI generated Response.
Asked by: Rahul
Created at: 2026-01-25 20:39:20
Asked by: Rahul
Created at: 2026-01-25 20:39:20
Final Answer:
Rendered
Raw Text
Did you like this answer?
# Step-by-Step Solution for the Given Problem
## 1. Free-Body Diagram for Bar AB
### Description
- **Bar AB** is a two-force member supported by pins at **A** and **B**.
- **Forces Acting:**
- Two downward forces of \(90\,N\) each, located at \(100\,mm\) and \(200\,mm\) from point **A**.
### Diagram Representation
```
A (pin)
|-------------------|-------------------|
<--100mm--|--100mm--|--100mm--> (200mm total)
↓90N ↓90N
```
- Reactions at A: \(A_x\) (horizontal), \(A_y\) (vertical)
- Reactions at B: \(B_x\) (horizontal), \(B_y\) (vertical)
---
## 2. Free-Body Diagram for Bar DB
### Description
- **Bar DB** is pinned at **D** and **B** and is vertical.
### Diagram Representation
```
D (pin)
|
|
|
B (pin)
```
- Reactions at D: \(D_x, D_y\)
- Reactions at B: \(B_x', B_y'\) (equal and opposite to those on AB)
---
## 3. Equilibrium Equations
### For Bar AB
1. **Sum of Forces in x-direction** (\(\Sigma F_x\)):
\[
A_x + B_x = 0
\]
2. **Sum of Forces in y-direction** (\(\Sigma F_y\)):
\[
A_y + B_y - 90 - 90 = 0 \implies A_y + B_y = 180
\]
3. **Sum of Moments about point A** (\(\Sigma M_A\)):
\[
-90 \times 100 - 90 \times 200 + B_y \times 200 = 0
\]
\[
-900 - 18000 + 200B_y = 0
\]
\[
200B_y = 18900 \implies B_y = \frac{18900}{200} = 94.5\,N
\]
### Substitute \(B_y\) into \(\Sigma F_y\):
\[
A_y + 94.5 = 180 \implies A_y = 180 - 94.5 = 85.5\,N
\]
### For Bar DB
1. **Sum of Forces in x-direction** (\(\Sigma F_x\)):
\[
D_x + B_x' = 0
\]
2. **Sum of Forces in y-direction** (\(\Sigma F_y\)):
\[
D_y + B_y' = 0
\]
Since \(B_y' = B_y\) and \(B_x' = B_x\).
---
## 4. Solve for Reactions at A, B, and D
### At B
- From equilibrium equations:
\[
B_y = 94.5\,N
\]
- Assuming \(B_x\) is horizontal.
### At A
- From x-direction equilibrium:
\[
A_x + B_x = 0 \implies A_x = -B_x
\]
### At D
- Use the relationship between reactions:
\[
D_x = -B_x, \quad D_y = -B_y
\]
### Final Values
Assuming \(B_x = 0\) (as vertical), we can calculate:
1. **At A**:
\[
A_x = 0, \quad A_y = 85.5\,N
\]
2. **At B**:
\[
B_x = 0, \quad B_y = 94.5\,N
\]
3. **At D**:
\[
D_x = 0, \quad D_y = -94.5\,N
\]
---
## Summary Table
| Point | \( F_x \) (N) | \( F_y \) (N) |
|-------|:-------------:|:-------------:|
| A | 0 | 85.5 |
| B | 0 | 94.5 |
| D | 0 | -94.5 |
---
## Final Answers
\[
\boxed{
\begin{aligned}
A_x &= 0 \quad & A_y &= 85.5\,\text{N} \\
B_x &= 0 \quad & B_y &= 94.5\,\text{N} \\
D_x &= 0 \quad & D_y &= -94.5\,\text{N}
\end{aligned}
}
\]
This concludes the analysis of the forces acting on the bars AB and DB. If you require further clarification or additional information, please let me know!
📢 Instructions:
- Ask anything relatd to above question only.
- For new Question goto :