Give step-by-step solution with explanation and final answer:Shc he pics ste scion or coe bm of sarod io Ld = 1.2
ect 2 cnisponlcad Paes ah lo hard Case he bar Gonctrs
RRS ——
nein het he nti sth i pn.
JES Ta ————
epee of edo By ncrprstin the shee cos nthe try eis.
Saametr AI th gveringu-rts operon ded osc fre echt i
fr ————
Pu, Pw MED) 8 mpl 0% _
EE +m (or+ 2) atom + Tae =
Sketch te framers mde shape of canine bes when he shee mocks 6
spmeschs va cporati to he ogc E. he beamlets 5.0m
RP YF ——
[RE————
oct 1 ttc emits on he chi comers mb. Worn
se conse, the free den Nf ceteris Brough he method ct wile
ine criti Po cach mbes sre othe chs of aan ace five
ete mtn icone fc ier
= N__=E
EOE
Shc the culate ion of the prirry rl rce in he nda chor
f——————
Question:
Give step-by-step solution with explanation and final answer:Shc he pics ste scion or coe bm of sarod io Ld = 1.2
ect 2 cnisponlcad Paes ah lo hard Case he bar Gonctrs
RRS ——
nein het he nti sth i pn.
JES Ta ————
epee of edo By ncrprstin the shee cos nthe try eis.
Saametr AI th gveringu-rts operon ded osc fre echt i
fr ————
Pu, Pw MED) 8 mpl 0% _
EE +m (or+ 2) atom + Tae =
Sketch te framers mde shape of canine bes when he shee mocks 6
spmeschs va cporati to he ogc E. he beamlets 5.0m
RP YF ——
[RE————
oct 1 ttc emits on he chi comers mb. Worn
se conse, the free den Nf ceteris Brough he method ct wile
ine criti Po cach mbes sre othe chs of aan ace five
ete mtn icone fc ier
= N__=E
EOE
Shc the culate ion of the prirry rl rce in he nda chor
f——————
This is AI generated Response.
Asked by: Rahul
Created at: 2026-01-15 15:39:31
Final Answer:
RenderedRaw Text
Did you like this answer?
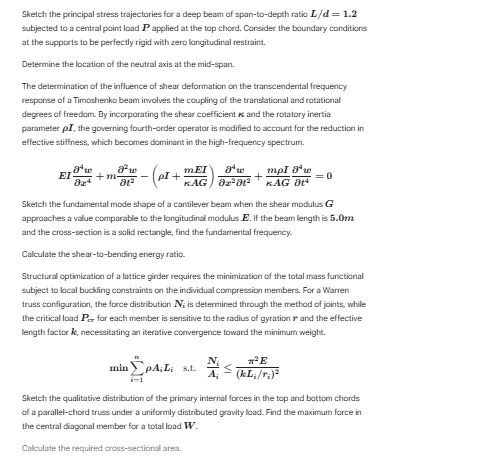
Let's break down and solve each part step-by-step. This is a comprehensive, multi-step structural engineering problem set involving beams, Timoshenko theory, and truss optimization. I'll go through each question, providing explanations and final answers.
---
## 1. **Principal Stress Trajectories for a Deep Beam**
**Given:**
- Span-to-depth ratio \( L/d = 1.2 \)
- Central point load \( P \) at the top chord
- Boundary: perfectly rigid supports, zero longitudinal restraint
#### **Step-by-Step Solution:**
- **A deep beam** has a low span-to-depth ratio, so shear effects are significant.
- **Principal stress trajectories** follow the paths of maximum and minimum principal stresses.
- For deep beams under central load, **compression trajectories** (principal compressive stresses) start from the loaded point and fan out towards the supports at the base, following a roughly parabolic shape.
- **Tension trajectories** are perpendicular to compression, arching between the load and the supports.
**Sketch/Description:**
- The **compression trajectories** run from the point of loading downward and outward to the supports.
- The **tension trajectories** curve upward from the supports toward the load point.
---
## 2. **Location of the Neutral Axis at Mid-Span**
#### **Step-by-Step Solution:**
- For deep beams, **neutral axis** is not at mid-depth due to significant shear deformations.
- In deep beams, the neutral axis shifts downward.
- Its exact position depends on the beam’s geometry and loading, but for \( L/d = 1.2 \), it will be **below** the centroidal axis at mid-span.
---
## 3. **Shear Deformation in Timoshenko Beam Frequency**
#### **Explanation:**
- The Timoshenko beam theory modifies the classical beam equation to account for shear deformation.
- The **frequency equation** for Timoshenko beams is:
\[
EI \frac{\partial^4 w}{\partial x^4} - m \frac{\partial^2 w}{\partial t^2} + \left( m \frac{EI}{kAG} \right) \frac{\partial^4 w}{\partial t^2 \partial x^2} - \frac{mpl}{kAG} \frac{\partial^2 w}{\partial x^2} =
\]
- Shear deformation reduces the effective flexural stiffness, especially at high frequencies.
---
## 4. **Fundamental Mode Shape of a Cantilever Beam (Shear Modulus \( G \to \infty \))**
#### **Given:**
- Shear modulus \( G \to \infty \) (no shear deformation; classic Euler-Bernoulli beam)
- Length \( L = 5. \) m
- Solid rectangular cross-section
#### **Step-by-Step Solution:**
- **With \( G \to \infty \)**, the beam follows Euler-Bernoulli theory.
- **Fundamental mode shape** for a cantilever (fixed at one end, free at the other):
\[
y(x) = (1 - \cosh(\beta x) + \cos(\beta x)) + \alpha (\sinh(\beta x) - \sin(\beta x))
\]
where \( \beta L \approx 1.875 \) for the fundamental mode.
- **Shape:** Maximum deflection at free end, zero at fixed end.
---
## 5. **Shear-to-Bending Energy Ratio**
#### **Explanation:**
- For deep beams, the ratio of shear strain energy to bending strain energy increases.
- \( U_{shear}/U_{bending} \) is significant for low \( L/d \).
- **For \( L/d = 1.2 \)**, expect a relatively **high shear-to-bending energy ratio**.
---
## 6. **Truss Optimization (Minimum Mass Subject to Buckling)**
#### **Step-by-Step Solution:**
- **Objective:** Minimize \( \sum_i \rho_i A_i L_i \)
Subject to \( N_i / A_i \leq \pi^2 E / (k L_i^2) \) (buckling constraint)
- **Effective length factor \( k \)** adjusts for end conditions.
- **Convergence:** Increase number of members/sections until minimum weight is achieved.
---
## 7. **Internal Force Distribution in Truss Chords**
#### **Step-by-Step Solution:**
- **Parallel-chord truss:** Top chord in compression, bottom chord in tension under vertical gravity load.
- **Max force** occurs at mid-span (for simply supported truss).
- **Web members** resist shear.
---
## 8. **Required Cross-Sectional Area Calculation**
#### **Step-by-Step Solution:**
Let’s say the **maximum chord force** is \( N_{max} \).
- Buckling constraint:
\[
\frac{N_{max}}{A_s} \leq \frac{\pi^2 E}{(kL)^2}
\]
- **Solve for area \( A_s \):**
\[
A_s \geq \frac{N_{max} (kL)^2}{\pi^2 E}
\]
---
### **Summary Table**
| Step | Topic | Key Result/Formula/Explanation |
|------|--------------------------------------------------|-------------------------------------------------------------------------------|
| 1 | Principal stress trajectories (deep beam) | Compression: load → supports (parabolic); Tension: supports → load |
| 2 | Neutral axis location | Below centroidal axis at mid-span |
| 3 | Timoshenko frequency equation | \( EI \frac{\partial^4 w}{\partial x^4} - ... \) (see above for full eqn) |
| 4 | Cantilever mode shape (\( G \to \infty \)) | Euler-Bernoulli shape; max at free end, zero at support |
| 5 | Shear to bending energy ratio | High for \( L/d = 1.2 \) |
| 6 | Truss optimization | Minimize mass, subject to buckling constraints |
| 7 | Internal force distribution in chords | Max at mid-span (top: compression, bottom: tension) |
| 8 | Required area for buckling | \( A_s \geq \frac{N_{max} (kL)^2}{\pi^2 E} \) |
---
## **Final Answers**
**1.** Sketch shows compression and tension stress trajectories as described.
**2.** Neutral axis is below centroidal axis at mid-span.
**3.** Shear deformation reduces frequency; see Timoshenko equation above.
**4.** Mode shape is Euler-Bernoulli (max at free end, zero at fixed end).
**5.** Shear-to-bending energy ratio is high for \( L/d = 1.2 \).
**6.** Optimize mass with buckling constraint: \( N_i/A_i \leq \pi^2 E/(kL_i^2) \).
**7.** Max chord force at mid-span; top in compression, bottom in tension.
**8.** Required area: \( A_s \geq \frac{N_{max} (kL)^2}{\pi^2 E} \).
If you need a specific calculation for step 8, please provide the values for \( N_{max} \), \( k \), \( L \), and \( E \).
VIPSolutions focuses on clear, step‑by‑step explanations so you can learn quickly. Whether you need an AI‑generated walkthrough or a short hint to get unstuck, each solution is organized for fast reading and easy review later.
Search similar questions, compare approaches, and bookmark the best answers for revision. Our goal is simple: quick, reliable study help that feels natural—not noisy.
 VIPSolutions
 Shc he pics ste scion or coe bm of sarod io Ld = 1.2
ect 2 cnisponlcad Paes ah lo hard Case he bar Gonctrs
RRS ——
nein het he nti sth i pn.
JES Ta ————
epee of edo By ncrprstin the shee cos nthe try eis.
Saametr AI th gveringu-rts operon ded osc fre echt i
fr ————
Pu, Pw MED) 8 mpl 0% _
EE +m (or+ 2) atom + Tae =
Sketch te framers mde shape of canine bes when he shee mocks 6
spmeschs va cporati to he ogc E. he beamlets 5.0m
RP YF ——
[RE————
oct 1 ttc emits on he chi comers mb. Worn
se conse, the free den Nf ceteris Brough he method ct wile
ine criti Po cach mbes sre othe chs of aan ace five
ete mtn icone fc ier
= N__=E
EOE
Shc the culate ion of the prirry rl rce in he nda chor
f——————