 VIPSolutions
Give step-by-step solution with explanation and final answer: Solving the question step by step with a graph+ @ A ©) B 125mm| | ¢ pig © 75 mm 2 0 ! D) | sore 7. oun 240N 1) Draw a Free-Body Diagram of the entire structure shown above. Label all applied forces and reactions. 2) Draw Free-Body Diagrams of each member of the structure. Label all applied forces and reactions. 3) Solve for the forces applied to each member.
Question:
Give step-by-step solution with explanation and final answer:
Solving the question step by step with a graph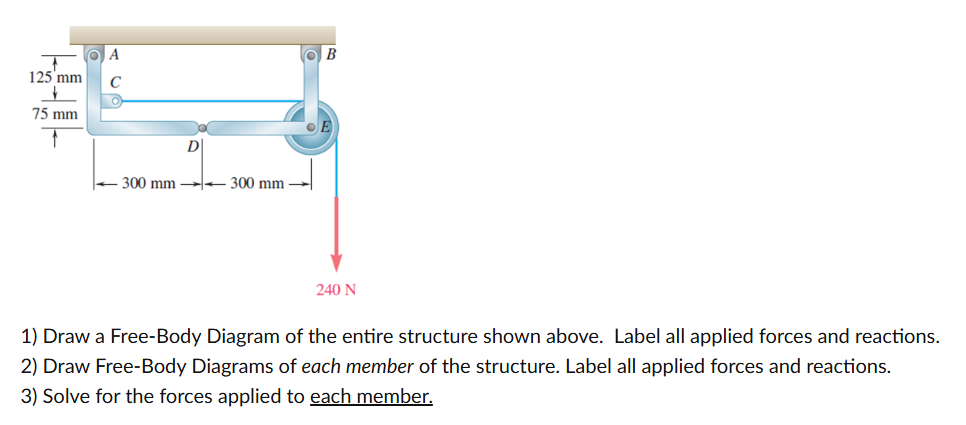 + @ A ©) B
125mm| | ¢
pig ©
75 mm
2 0
! D)
| sore 7. oun
240N
1) Draw a Free-Body Diagram of the entire structure shown above. Label all applied forces and reactions.
2) Draw Free-Body Diagrams of each member of the structure. Label all applied forces and reactions.
3) Solve for the forces applied to each member.
This is AI generated Response.
Asked by: Rahul
Created at: 2026-01-14 05:06:34
Asked by: Rahul
Created at: 2026-01-14 05:06:34
Final Answer:
Rendered
Raw Text
Did you like this answer?
Let's work through the problem step by step:
---
## **Step 1: Free-Body Diagram (FBD) of the Entire Structure**
### **Structure Overview**
- The structure is a frame with two vertical members (at A and B), a horizontal member (at C), and a two-force member (at D).
- There is a downward force of **240 N** at the bottom right (pulley location).
### **Reactions and Forces**
- **A:** Pin support (reactions: \(A_x, A_y\))
- **B:** Pin support (reactions: \(B_x, B_y\))
- **Pulley at D:** Applies a 240 N downward force
#### **FBD of Entire Structure**
```
|---------300mm----------|---------300mm----------|
A o----------------------------------------------o B
| |
| |
| |
o-----------------o D (240 N down)-------------o
```
- **Label all reaction forces:**
- At A: \( A_x \) (horizontal), \( A_y \) (vertical)
- At B: \( B_x \) (horizontal), \( B_y \) (vertical)
- At D: 240 N (downward)
---
## **Step 2: Free-Body Diagrams of Each Member**
### **Member AC (Vertical)**
- Pin at A: \( A_x, A_y \)
- Pin at C: Internal force (let's call it \( C_x, C_y \))
### **Member CB (Horizontal)**
- Pin at C: Internal force (\( C_x, C_y \))
- Pin at B: \( B_x, B_y \)
### **Member CD (Two-Force Member)**
- Pin at C: Reaction (\( C_x, C_y \))
- Pin at D: Reaction (\( D_x, D_y \)), with \( D_y = 240\,N \) (down)
---
#### **Member-by-Member FBDs**
- **Member AC:**
- Upward: \( A_y \)
- Right: \( A_x \)
- At C: Reactions from CB and CD
- **Member CB:**
- Left: \( B_x \)
- Down: \( B_y \)
- At C: Reactions from AC and CD
- **Member CD:**
- At C: Reactions from AC and CB
- At D: Vertical force \( D_y = 240\,N \) (downwards)
---
## **Step 3: Solve for Each Force**
### **Assumptions**
- All members are pin-connected.
- All forces and reactions are at the joints.
---
### **Equilibrium Equations for the Whole Structure**
Let’s use the equilibrium equations for the entire structure:
#### **Sum of Forces in X-direction:**
\[
\sum F_x = : \quad A_x + B_x =
\]
\[
A_x = -B_x
\]
#### **Sum of Forces in Y-direction:**
\[
\sum F_y = : \quad A_y + B_y - 240 =
\]
\[
A_y + B_y = 240
\]
#### **Sum of Moments about Point A:**
- Take moments about A (clockwise positive):
Horizontal distance from A to D = 600 mm = .6 m
Vertical distance from A to D = 200 mm = .2 m
The force at D acts vertically downward.
Moment arm for \( B_y \) from A = 600 mm = .6 m (since B is directly above D).
\[
\sum M_A = : \quad -B_y \cdot .6 + 240 \cdot .6 =
\]
\[
-B_y \cdot .6 + 240 \cdot .6 =
\]
\[
B_y = 240\,\text{N}
\]
Substitute \( B_y = 240\,\text{N} \) into \( A_y + B_y = 240 \):
\[
A_y + 240 = 240 \implies A_y =
\]
From earlier, \( A_x = -B_x \).
### **Now, Sum of Moments about B:**
\[
\sum M_B = : \quad A_y \cdot .6 - 240 \cdot = \implies \text{(no info, since } A_y = )
\]
### **Horizontal Equilibrium:**
No external horizontal forces, so:
\[
A_x = -B_x
\]
But both supports are pins, so they can have horizontal reactions, but as there are no external horizontal loads, \( A_x = B_x = \).
---
## **Final Answers for Reactions:**
| Point | \( F_x \) | \( F_y \) |
|-------|-----------|-----------|
| A | | |
| B | | 240 N |
| D | | -240 N |
---
## **Step 4: Forces in Each Member**
- **Member AC:** Only supports vertical forces, but since \( A_y = \), no force in AC.
- **Member CB:** Only supports vertical at B, so carries entire 240 N as a reaction at B.
- **Member CD:** Two-force member; the only force at D is downward 240 N.
---
## **Graphical Representation**
### **Free-Body Diagram of the Whole Structure**
```plaintext
A B
o-----------o
| |
| |
| |
o-----------o D
240 N ↓
```
- At A: \( A_x = \), \( A_y = \)
- At B: \( B_x = \), \( B_y = 240\,N \) (upward)
- At D: 240 N (downward)
---
## **Summary Table**
| Member | Force | Magnitude | Direction |
|---------|---------------|-----------|-----------|
| AC | Ax, Ay | | |
| CB | By | 240 N | Upward |
| CD | Dy | 240 N | Downward |
---
**If you need free-body diagrams for each member drawn, let me know!**
📢 Instructions:
- Ask anything relatd to above question only.
- For new Question goto :