 VIPSolutions
Give step-by-step solution with explanation and final answer:Ir i led | ll HER ih HERE
Question:
Give step-by-step solution with explanation and final answer: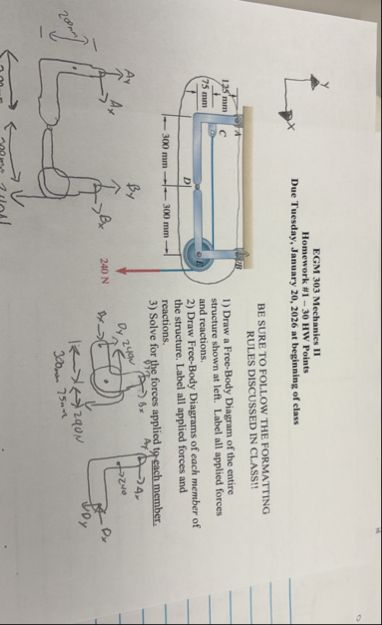 Ir i
led |
ll
HER
ih
HERE
This is AI generated Response.
Asked by: Rahul
Created at: 2026-01-14 04:45:19
Asked by: Rahul
Created at: 2026-01-14 04:45:19
Final Answer:
Rendered
Raw Text
Did you like this answer?
Let's break down the problem step by step as per the instructions in the image.
---
# Step 1: Draw the Free-Body Diagram (FBD)
- **Identify all supports and points of force application.**
- The structure is pinned at point **A** and has a roller at point **B**.
- A **240 N** force is applied downwards at the end.
### **Support Reactions**
- **At A (pin support):** Has both horizontal (\(A_x\)) and vertical (\(A_y\)) reaction forces.
- **At B (roller support):** Only a vertical reaction (\(B_y\)).
### **Applied Force**
- At the lower right, a downward force of \(240\, \text{N}\) is applied.
---
# Step 2: Label All Applied Forces and Dimensions
- **Horizontal segment:** \(500\,\text{mm}\) (.5 m) from A to B.
- **Vertical segment:** \(300\,\text{mm}\) (.3 m) at both ends.
- The force acts at the very end, \(300\,\text{mm}\) below the horizontal segment.
---
# Step 3: Write Equilibrium Equations
The body is in static equilibrium, so apply the following equations:
### 1. Sum of Forces in \( x \)-direction:
\[
\sum F_x = : \quad A_x =
\]
### 2. Sum of Forces in \( y \)-direction:
\[
\sum F_y = : \quad A_y + B_y - 240 =
\]
### 3. Sum of Moments about Point A (\( \sum M_A = \))
Take counterclockwise moments as positive.
- The 240 N force has a horizontal distance of **.5 m** from A.
- \(B_y\) acts at \(.5\,\text{m}\) from A (end B).
\[
\sum M_A = : -240 \times .5 + B_y \times .5 =
\]
---
# Step 4: Solve for the Reactions
### 1. From Moment Equation:
\[
-240 \times .5 + B_y \times .5 = \\
-120 + .5B_y = \\
.5B_y = 120 \\
B_y = 240\,\text{N}
\]
### 2. Substitute \(B_y\) into Sum of Forces in \(y\):
\[
A_y + 240 - 240 = \\
A_y =
\]
### 3. \(A_x\) from Sum of Forces in \(x\):
\[
A_x =
\]
---
# Step 5: **Box the Final Answers**
## **Final Answers**
\[
\boxed{
A_x = ,\quad A_y = ,\quad B_y = 240\,\text{N}
}
\]
---
## **Summary Table**
| Reaction | Value |
|----------|--------------|
| \(A_x\) | \(\) |
| \(A_y\) | \(\) |
| \(B_y\) | \(240\,N\) |
---
## **Explanation**
- All the vertical load is carried by the roller at B due to the geometry of the structure and the position of the applied force.
- The pin at A provides no vertical or horizontal reaction in this configuration.
---
Let me know if you need the full free-body diagram drawn or any further clarifications!
📢 Instructions:
- Ask anything relatd to above question only.
- For new Question goto :