 VIPSolutions
Give step-by-step solution with explanation and final answer:11Draw the isometric views using the orthographic views for al figures shown AND. 20Filinthe missing ines and draw the complete orthogonal views on an orthogonal grid sheet. Top Front R Side Figure
Question:
Give step-by-step solution with explanation and final answer: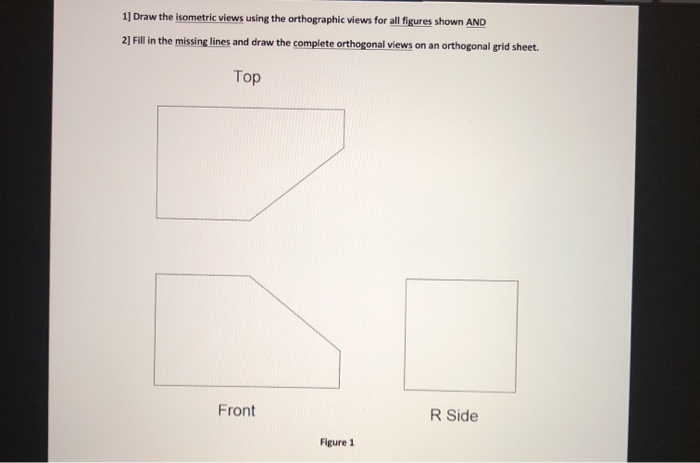 11Draw the isometric views using the orthographic views for al figures shown AND.
20Filinthe missing ines and draw the complete orthogonal views on an orthogonal grid sheet.
Top
Front R Side
Figure
This is AI generated Response.
Asked by: Rahul
Created at: 2026-01-11 04:11:52
Asked by: Rahul
Created at: 2026-01-11 04:11:52
Final Answer:
Rendered
Raw Text
Did you like this answer?
Let's break down the step-by-step solution for Figure 1, which asks for both **isometric** and **complete orthographic views**:
---
## **Step 1: Analyze Orthographic Views Provided**
- **Top View:** Shows a rectangle with the top-right corner cut off (slant).
- **Front View:** Shows a rectangle with the top-left corner cut off (slant).
- **Right Side View:** Shows a plain rectangle.
---
## **Step 2: Infer the 3D Shape**
- The **slant** in the top view is on the **right**.
- The **slant** in the front view is on the **left**.
- The **right side view** is a plain rectangle, meaning the object has a constant profile from this side.
- **Conclusion:** Both the top and front slants likely meet at the same height/depth, forming a wedge cut.
---
## **Step 3: Draw the Isometric View**
### **Isometric Steps:**
1. **Draw the base rectangular prism**:
- Length (horizontal, from front view): as per the front view width.
- Width (depth, from top view): as per the top view depth.
- Height (vertical): as per the front view height.
2. **Cut off the wedge as shown**:
- From the top, cut the top-right corner.
- From the front, cut the top-left corner.
- The cuts meet at an edge on the top.
### **Isometric Drawing Sketch:**
- Start with a box.
- On the top face, slice off the top-right corner.
- On the front face, slice off the top-left corner.
- The resulting shape will have a sloped face running from front-left to top-right.
---
## **Step 4: Complete the Orthographic Views**
The provided views are already correct; no missing lines are indicated in the question.
- **Top View:** Shows the upper face with the slant.
- **Front View:** Shows the front face with the slant.
- **Right Side View:** Shows the side face (rectangle), no slant visible here.
---
## **Step 5: Final Answers**
### **Isometric View (Sketch Explanation)**
```
/--------/
/ /
/ /
/--------/
| |
| |
| |
/--------/
```
- The top and front faces both have a slant, forming a wedge.
### **Completed Orthographic Views**
- **Top View:** Already correct.
- **Front View:** Already correct.
- **Right Side View:** Already correct.
---
### **Summary Table**
| View | Description |
|----------|----------------------------------------------|
| Top | Rectangle with top-right slant |
| Front | Rectangle with top-left slant |
| Right | Rectangle (no slant, full height & depth) |
| Isometric| Wedge shape with two slanting faces |
---
## **Final Answer**
- **The isometric view is a rectangular prism with a wedge cut such that the top face has a slant on the right, and the front face has a slant on the left.**
- **All orthographic views provided are already complete.**
---
If you need a precise drawing, please specify if you want it in a grid or as a simple sketch.
📢 Instructions:
- Ask anything relatd to above question only.
- For new Question goto :